Thursday, January 31, 2013
DIY for the rest of us - A Glue Gun, Contact Paper and Duct Tape
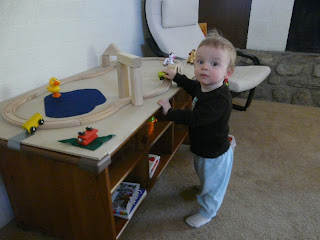
You can make a lot of kids' toys with a glue gun and duct tape. Throw in some contact paper and you are set. Two projects that each took me about an hour and a half were Nate's train table and his little kitchen. The train table features a $10 IKEA train set glued down to a plywood sheet, with some arches made from blocks (glued down) and some felt pieces for water and grass (glued down). Pretty easy. Then I duct taped the whole thing to the coffee table, so I can take it off now and then to keep it fresh.
The kitchen is basically three boxes covered in contact paper, with felt circles (glued down) for burners and some boxes (glued up) hanging from the left hand box for shelves. Total cost on that one was probably about thirty cents.
I'm planning to become handy. Very handy. I have already purchased sand paper and an electric drill so that one day soon I will be making the DIY trestle tables, art tables, bookshelves, reading tents and everything else so tempting at Ana White's incredible make-your-own-everything site. But for now, I recommend a glue gun. And duct tape. And contact paper. You'll soon find the sky's the limit.
Wednesday, January 23, 2013
The Getaway Room
It's nice to be able to get away. In your own house. With your toddler. So breakfast went badly. Or maybe the train table just stopped being fun. Or it was really hard to say goodbye to Dad when he left for work. Or the main house is a total wreck and you won't be able to clean it until nap time.
Enter, the getaway.
We tipped a bookshelf on its side, added some toys, put a blanket on the floor and some boxes and books in the corner, and voila! A getaway room in the guest room. Sometimes a change of space turns a tough moment into a great chance to play. We getaway every morning after breakfast, and whenever the need arises.
Who needs Expedia when you can just toddle down the hall?
Tuesday, January 22, 2013
Tunnels
Inspired by N's love of playground and playroom tunnels when we go out, we've made a lot of indoor tunnels. We often make them with blankets over various sizes of tables, but we've also had great luck with cardboard sides. We got a HUGE cardboard box from Amazon filled with diapers a few months ago and after using it as a tunnel of its own for a while, I took it apart and created tunnel sides with the big pieces. I added some windows with an exact-o knife and N and I like to peek in and out of the windows at each other or push toys back and forth.
As fun as tunnels are, and they are very fun, they have a limited fun duration. It's nice to be able to take them apart easily after a day or two and put the pieces away.
Monday, January 21, 2013
Climbing Play
Every few days I find a new way to add different levels to the spaces N plays in. Whether it's scooting a footstool over to make a step onto the toy box, dragging storage tupperwares into a giant platform and covering them with a blanket, filling shipping boxes with books and creating steps in the corner of the guest room, or making a giant multi-leveled play island from all of the above, these small shifts in furniture really add to N's play. He likes to climb on the different levels, stand by them, stack things on them, sit on them, and practice getting on and off them.
As you build climbing installations for your little one, consider his abilities to get off and on alone. If you want to be able to leave him in a room alone for a minute, be sure the steps are small and blankets and pillows abound. At the moment, N is very interested in practicing walking on and off steps, so I have to keep my eye on him when he's up on anything.
Subscribe to:
Comments (Atom)


